

This article was written by PizzaPotatoNBacon for projecteducate's Community Week June 3rd - June 9th. This article is written to explain the basics of Journal Skin CSS Code- however it does not contain much information on the layout and structure of journal skins. Basic knowledge of HTML is needed to understand most of the article. Does not include information on Gallery CSS. And yes, you do have to have a bit of patience when it comes to coding. If a lazy bum like me can do it, so can you. ![]()
Hola! 
Today, I'll be talking about CSS and how it works. This article is intended for newcomers and beginners, and only explains how it works, and how it "happens". From the syntax to the basic codes, from examples to links, this article that I had spent sleepless nights on is for you! I hope the information and explanations within this publication is easy to understand. If you have any questions regarding basic CSS, feel free to ask me. ![]()
:bademoticon:Index for easy navigation
One way to describe CSS and HTML and a web page, it's like a puppet. HTML is the puppeteer, and the web page is the puppet. However, CSS is like the clothing on the puppet- it stylises HTML, gives them a bit more flair and consistency. Another way to describe it, is that the HTML is a director. It tells the web page (Actor) what to do. And CSS, being the stylising code it is, is the Make Up Artist. HTML may control what's on your page, but CSS makes it look pretty and sparkly. This is a subjective description, but you catch my drift.
") How does it work with deviantART Journal Skins, then?
How does it work with deviantART Journal Skins, then?
All members of deviantART can use HTML in their journal entries- and you can stylize that HTML with a journal skin CSS! Unfortunately, while everyone can use [certain] HTML in their entries, they cannot have the HTML stylised by Journal Skins. The site manages to turn your code into installable skin- not sure if it's magic or just some bad*ss programming by the awesome dA staff- for others to enjoy. But how does CSS work in the skin itself?
Let's go back to the puppeteer theory. Now, imagine two kinds of puppeteers. One has lots and lots of accessories and dresses for their puppet, and the other has a limited amount of clothes for their puppet. The same applies to Journal Skin CSS. In Journal Skins, some things can't be applied to your HTML elements when they can in site-wide CSS.
Why am I putting this here? This is just a bit of a forewarning- that any neat code you find [outside of a deviantART Journal skin tutorial] may not work. Of course, this shouldn't be that much of a problem. Remember, limitation prompts creativity! Don't be afraid to tweak things around and break barriers- getting out of that shell is something we all love to do! ![]()
 Jumping Into The Realm: Learn the lingo, and love the language
Terms:
- Element - In HTML, this is the content/effect/container formatted with its respective HTML tag.
- Declaration - In CSS, this a string of code that contains a property, and a value, that will modify your HTML elements and parts of your journal skin. Example:
b {
property:value
}
- Property - This is a certain setting of an element- a property (thus it is named so) of the element. What do I mean by this? Here is an example:
b {
height: - This tells the browser what property of the element are we going to modify. In this case, it is the height of the element.
}
- Value - This is how the setting is changed. Default skins have certain settings, so when you create a journal skin, you must declare a value for properties of an element, otherwise things will stay the same.

b {
height: 10px; - This tells the browser the "value" of your property. Values can range from color codes to equations- it depends on the property itself. SInce the property is the height of the element, I'm making the height of "b" 10px.
}
- [Magic] Curly Brackets [of fairy sparkles] - These babies: {}. Your modifying code goes in between these.

b { - This is the opening bracket. It goes right after your element, and right before your first declaration.
height: 10px;
} - This is the closing bracket. Once you're done with your code, close it with this hotshot.
- Comments - CSS comments are text that are in the code but don't affect it in anyway. These are text within /* */'s and they can be used for notes on the code, labels, extra code to be used later.
/* This is a Comment Hurr durr */
b {
height: 10px;
} Take note that, in deviantART CSS, one cannot put a comment in between declarations and Curly Brackets.
property: value;
}
property: value;
property: value;
property: value;
}
property: value;
property: value;
property: value;
property: value;
}
 Basic, but important!
Basic Properties
- background - Obviously, it changes the background of your div. This can be an image, color, or even a gradient! The syntax for "background" is background: url('directlinkhere')|color|#00000|(r,g,b,a);. You can have both image and color in the background.
- color- This affects the text color within your div. The syntax for "color" is color: color|#00000|(r,g,b,a);.
- border - This is the border of your div. You can modify all or specific sides of the border by using these properties: border-left (modifies the left side), border-right (modifies the right side), border-top (modifies the top), and border-bottom (modifies the bottom). The syntax for "border" is border: 0px solid|dashed|dotted color|#00000|(r,g,b,a);.
- margin - This is the space between your element/div and other elements. You can apply margin to all sides, or to specific sides, similar to "border". Use the properties margin-left, margin-right, margin-top, and margin-bottom to modify left margin, right margin, top margin, and bottom margin, respectively. The syntax for "margin" is margin: 0px|0%|auto;
- padding - This is the space between the border of your div and your div's content. You can apply padding to all sides, or to specific sides, similar to "border". Use the properties padding-left, padding-right, padding-top, and padding-bottom to modify left padding, right padding, top padding, and bottom padding, respectively. The syntax for "padding" is padding: 0px|0%|auto;
If you notice, many journal skins modify normal HTML elements to fit the rest of the skin itself, so it's important that, in the case they don't look right with your skin, you must still modify the Standard HTML elements. Here is a list of "basic" HTML elements modifiable for Journal Skins.
i {}, em {} - The same case as <b>bold</b> and <strong>. Both yield the same effect.
u, ins {} - Nearly the same case as <b>bold</b> and <strong>. Both yield almost the same effect.
strike {}
p {}
blockquote {}
sup {}
sub {}
small {}
.abbr {}
acronym
hr {} - Yes, you can style your horizontal lines.
code{}
tt {}
h1 {} to h6 {} - Take note that the selector for h2 should be .text h2 {} so you won't affect the journal title.
But that's not all!
We can create our own "elements", these are called "divs". This can be anything, really- from a new kind of text style similar to bold, italic, underline, to a fancy text container. From just images, to shapes. We can use the HTML elements we create to make works of art! ![]() And the process is very, very simple.
And the process is very, very simple.
.papaya - We create our own HTML element via CSS, by placing a "." then your element/div class name. That's it. Just that. Then put in all that sexy code.
.papaya {
property:value;
}
HTML
Read the description of this article for the HTML code.Effect
Since it is not an "real" HTML element, we have to specify which div we're using by using <div class="divclassname"></div>.
I just want to put this out here. Did you know you can modify elements within elements?You can modify what happens when one element/div is placed within another element/div. What magic happens when a <b tag is placed outside or inside a <p> tag? With CSS, you can do more with <p><b> than just make bold letters inside a <p> tag. This is also effective for making custom HTML easier for users of your skin, as explained in this lovely article written by no other than gillianivyart. There are more reasons why this is very, very important, such as your normal header blending in with the background of a custom div, maybe it's too big for that div.

Here are some fabulous resources, should you want to know more about CSS. ![]()
Tutorials and Resources
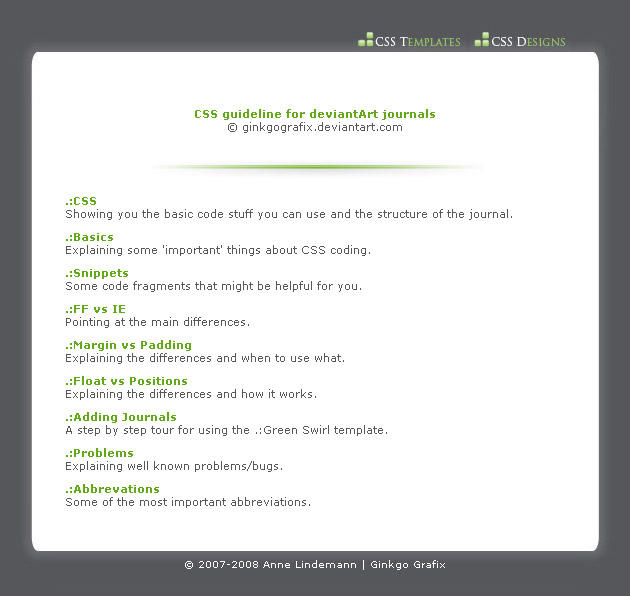
This tutorial is certainly a powerhouse. It is very comprehensive yet it is extremely understandable. With coverage on the basics, and lovely snippets, this is definitely worth a look. ![]()
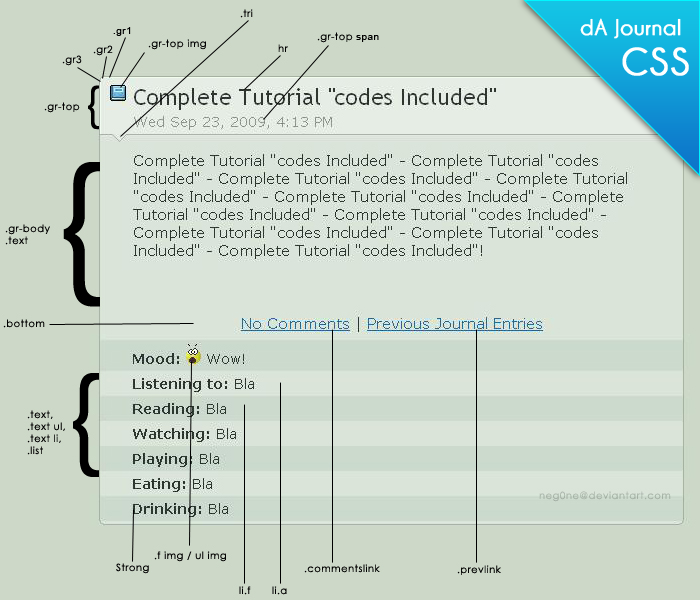
This nifty tutorial does a good job of explaining Journal Skin Structure. ![]()


This is really worth a read, since it explains a whole lot of CSS terms and codes. ![]()
:thumb354675797:
This article is very good at explaining the structure of Journal Skins and basic CSS codes. It provides snippets and guides you through the process of making your own Journal Skin! ![]() Very, very good resource for those new to CSS.
Very, very good resource for those new to CSS.
Last Week, projecteducate hosted a CSS3 week! The articles in these week are very comprehensive, and can help make your CSS more sexy. 
Groups

This group is dedicated to helping other improve or learn CSS skills. They collect everything CSS from tutorials to snippets, from CSS events announcements, to resources. This is a great place for all your [deviantART] CSS needs.

Did you know? ...That there's a group dedicated to sharing various CSS tips and tricks, by the means of comprehensive yet fully understandable articles? Check out CSS-DYK, made for those who'd like to do more with their CSS. Read excellent articles, and suggest topics for the next issue!
External References
w3schools.com - A lot of articles on CSS and good explanations. Highly recommended for beginners.
Css-tricks.com - Find neat tricks to use in your CSS! This site has a lot of snippets for you to use for your code, so it's worth a look at. ;D
Cssdesk.com - Got a snippet you want to try out? How about a little bit of live CSS practice? Are you sure there's nothing wrong with your code? Try css-desk! A fabulous way to try out your CSS codes and have them brought to life. ![]()
 That's all folks!
That's all I can fit into this article! While CSS is tough to get a hold of at first, but with a lot of practice, it's very easy to understand and code. If you have more questions about CSS, feel free to comment and ask me. Please note that I am not the best, however, and I don't guarantee I'd know the answer to your question, or the question to your answer. 
Thanks for reading, and have a nice day! ![]()